Planning your FUE hair transplant? One of the most common questions we hear at FlowGeniQ Digest is, “What should I expect after surgery—and when will I actually see results?” This guide walks you through a FUE hair transplant recovery timeline from day 1 through month 12, including typical side effects, what’s normal vs. what’s not, and the practical actions that help you heal well.
Keep in mind that every clinic has its own protocol and every patient heals at a slightly different pace. Use this timeline as a roadmap, then follow your surgeon’s instructions first.
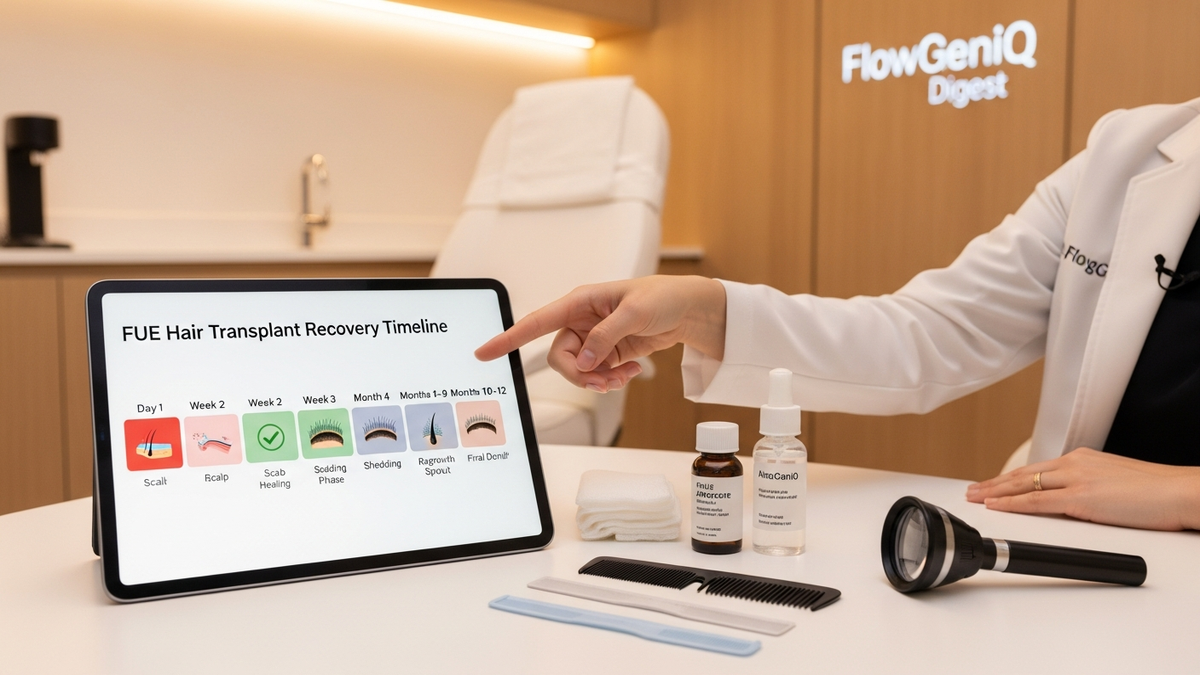
At-a-glance: the FUE hair transplant recovery timeline
Most patients go through three major phases:
- Early healing (days 1–14): scabs, redness, swelling (often mild), and sensitivity.
- Shock shedding (weeks 2–12): the transplanted hairs shed, which is expected.
- Regrowth (months 3–12): gradual thickening and visible improvement, with best results often emerging by the 9–12 month range.
Before you start: what “recovery” really means after FUE
FUE (Follicular Unit Extraction) involves removing individual follicular grafts and implanting them into tiny recipient sites. Your body then needs time to:
- Heal the donor area (where grafts were taken)
- Stabilize the grafts in the recipient area
- Re-enter the hair growth cycle
That’s why the timeline includes both physical healing and hair cycle changes. A “good” recovery isn’t only about fewer symptoms—it’s also about giving follicles the conditions they need to regrow.
FUE hair transplant recovery timeline: day 1 through week 4
Day 1 (0–24 hours): waking up, tightness, and the first dressing care
What you may feel: tightness, mild burning/itching, tenderness at the donor and recipient areas, and fatigue. Many patients also notice swelling around the forehead or temples.
What you may see: redness and small pinpoint marks in the recipient sites; the donor area may look slightly irritated.
What to do:
- Follow your clinic’s instructions for sleeping position (often head elevated).
- Take prescribed medications exactly as directed (commonly antibiotics, anti-inflammatory meds, and/or pain control).
- Avoid touching or rubbing the grafts.
- Use only approved products (no “DIY” oils or alcohol-based solutions).
When to contact your clinic: uncontrolled bleeding, severe pain that doesn’t improve with medication, fever, or rapidly worsening swelling.
Day 2: scabs begin to form
What you may feel: increased itchiness as the scalp starts healing. It can be tempting to scratch—try to resist.
What you may see: the recipient area begins forming tiny scabs around grafts.
What to do:
- Continue gentle care as instructed; do not pick scabs.
- Stay hydrated and eat nutrient-dense meals (protein supports tissue repair).
- Avoid strenuous activity.
Side effects to watch: worsening redness spreading beyond the treated area, pus-like discharge, or persistent fever.
Day 3: swelling may peak (varies by patient)
What you may feel: swelling can become more noticeable in the first few days. Some patients also feel mild numbness or “tingling.”
What you may see: scabs continue to develop; donor area remains tender.
What to do:
- Keep your head elevated while resting.
- Use cold compress only if your surgeon approves and provides specific guidance.
- Stick to a light routine—no bending over for long periods if it increases swelling.
When to contact your clinic: swelling that is rapidly expanding, severe headache, or any sign of infection.
Day 4: early showering and gentle cleansing (if approved)
What you may feel: itchiness continues; scalp may feel dry or tight.
What you may see: scabs are more defined.
What to do: Many clinics start very gentle washing around this time or within the first week. Follow your surgeon’s schedule exactly.
Key rule: no aggressive rubbing. Let water and approved techniques do the work.
Day 5–7: scab management and protecting grafts
What you may feel: itch is often the dominant symptom.
What you may see: scabs may begin loosening at the edges.
What to do:
- Continue gentle cleansing per instructions.
- Keep hair dry when told; avoid steam saunas.
- Wear any protective cap/cover only if your clinic recommends it.
Common side effects: mild redness, dryness, and temporary numbness in the donor area.
Contact your clinic if: you notice foul odor, increasing warmth at the surgical sites, or pus.
Week 2 (days 8–14): scabs shed and recipient sites stabilize
What you may feel: less soreness overall. You may still have some itching or tightness.
What you may see: scabs typically start falling off more clearly. The recipient area may look patchy while healing.
What to do:
- Continue washing as prescribed (often more normal than earlier days, but still gentle).
- Resume light daily activity if approved; avoid heavy lifting.
- Do not apply unapproved topical products.
Important: If you see small hairs in the shower or on the pillow, that can be normal—your hair cycle is about to shift.
Week 3: shock shedding begins for many patients
What you may feel: scalp sensitivity may be intermittent.
What you may see: many patients notice increased shedding of transplanted hairs. This is commonly called shock loss.
What to know: Shock shedding does not mean your grafts failed. It’s often a sign the follicles are moving into the next growth phase.
What to do: keep your routine consistent. Don’t panic-scrub your scalp or change products abruptly.
Week 4: shedding may continue; healing is mostly complete
What you may feel: many patients feel “back to normal” physically, though the scalp can still be dry.
What you may see: shedding continues. Some recipient hairs may appear thinner or patchy.
What to do:
- Keep follow-up appointments—your surgeon may assess healing and graft take.
- Follow the clinic’s plan for any post-op medications or topical therapies.
Weeks 5–12: the shock shedding window and early regrowth signs
Weeks 5–6: shedding peaks for some patients
What you may feel: often minimal discomfort now.
What you may see: shedding may be most noticeable. Hair may look sparse in the transplanted area.
What to do:
- Be gentle with washing—avoid aggressive combing.
- Don’t over-interpret early appearances. The hair cycle is still transitioning.
- If your clinic recommends medications (e.g., minoxidil or finasteride/dutasteride when appropriate), use them exactly as prescribed.
Weeks 7–8: early “stubble” may appear
What you may see: in some patients, fine hairs or “stubble” begins to emerge. These can be subtle.
Reality check: early growth doesn’t always look dense. Many people find that progress is easiest to track with photos and measurements.
Weeks 9–10: gradual improvement in texture
What you may feel: scalp may be less reactive than earlier weeks.
What you may see: hairs may become more noticeable, but density is still developing.
What to do: take consistent progress photos (same lighting, same angles). This helps your surgeon evaluate response and helps you stay grounded during the “awkward” phase.
Weeks 11–12: the 3-month checkpoint
What you may see: some patients notice clearer regrowth; others remain in a thin stage. Variation is normal.
What to do: if you’re concerned, discuss it at your next check-in rather than changing your regimen on your own.
Months 4–6: thickening, coverage, and what “normal” looks like
Month 4 (weeks 13–16): visible regrowth for many
What you may see: hairs often start to look more established. The transplanted area may begin blending better with surrounding hair.
Common side effects: mild dryness or occasional follicle sensitivity can occur, especially if you’re using new topicals.
Action step: if your clinic provides a tailored scalp care plan, stick to it. Consistency matters more than switching products frequently.
Month 5 (weeks 17–20): density begins to build
What you may see: increased density and improved coverage. Hair shaft thickness may start improving.
What to do: continue your post-op regimen. If you’re using any growth-support therapies, ensure you’re not missing doses.
Month 6 (weeks 21–24): mid-year progress
What you may see: many patients see a meaningful cosmetic difference by month 6, though final density is not yet at its peak.
What to track: coverage patterns (temples vs. crown), hair thickness, and how your hair behaves in different lighting.
Months 7–9: refinement and how results become “real”
Month 7 (weeks 25–28): blending improves
What you may see: better blending and a more natural look. Hair may appear fuller even if density gains are gradual.
Month 8: styling becomes easier
What you may see: improved styling options and less scalp visibility in many cases.
What to do: continue gentle scalp care and avoid harsh abrasion. If you color or chemically treat hair, confirm timing with your surgeon.
Month 9: noticeable density gains for many patients
What you may see: density often becomes more apparent. For some people, this is when results start to feel “worth it” visually.
When to contact your clinic: if you develop persistent itching, rash, or signs of scalp irritation that don’t resolve with standard care.
Months 10–12: final maturation window and long-term maintenance
Month 10: maturation continues
What you may see: hairs continue to thicken and mature. The transplanted hairline (or treated zones) becomes more refined.
Month 11: closer to your final look
What you may see: more stable density and improved texture. You may still see gradual changes as follicles mature.
Month 12: your “final” assessment (often)
What you may see: many surgeons consider month 12 an important milestone for overall evaluation. However, some patients continue improving beyond a year.
Long-term plan: discuss ongoing maintenance—especially if you have progressive hair loss. Transplanted hair may remain, but native hair loss patterns can continue.
Common FUE hair transplant recovery side effects (and what’s normal)
Every patient experiences symptoms differently. Below are common side effects and typical timelines. If your symptoms are severe, worsening, or accompanied by systemic signs (like fever), contact your clinic promptly.
1) Swelling (often forehead/temples)
- Typical timing: day 2–3, may peak around days 3–4, then gradually improves.
- What helps: head elevation; follow your clinic’s guidance for compresses/meds.
- Call the clinic if: swelling is rapidly worsening or associated with fever or severe pain.
2) Redness and scabbing
- Typical timing: most prominent during days 1–14.
- What helps: gentle washing per protocol; avoid picking.
- Call the clinic if: redness spreads significantly or becomes hot, painful, or infected-looking.
3) Itching
- Typical timing: often strongest during days 3–14.
- Tip: moisturize only with approved products; avoid scratching.
- Call the clinic if: itching is intense, persistent, and accompanied by rash or weeping.
4) Temporary numbness or tightness
- Typical timing: days to weeks.
- Call the clinic if: sensations are worsening or accompanied by pain out of proportion.
5) Shock shedding
- Typical timing: weeks 2–12 (often around weeks 3–8).
- What it means: follicles are cycling; shedding is usually expected.
- Call the clinic if: shedding is accompanied by infection signs or you have sudden, severe scalp symptoms.
6) Folliculitis or crusting bumps
- Typical timing: can appear in weeks 2–6.
- What to do: follow any prescribed anti-inflammatory/antimicrobial plan; don’t self-treat aggressively.
- Call the clinic if: bumps are painful, increasing, or draining.
What to do (and avoid) during your recovery
Do
- Follow your clinic’s washing schedule exactly.
- Sleep with your head elevated for the period your surgeon recommends.
- Use gentle handling: no rubbing, no picking scabs, no aggressive combing.
- Stay consistent with prescribed medications and approved topicals.
- Track progress with photos and notes (date, lighting, angles).
- Support healing with nutrition: adequate protein, hydration, and micronutrients.
Avoid
- Smoking and nicotine (can impair circulation and healing).
- Alcohol in the early phase if it worsens inflammation or dehydration.
- Heavy exercise and activities that increase blood pressure/pressure to the scalp during early healing.
- Saunas, steam rooms, swimming until your clinic clears you.
- Sun exposure without protection—ask your surgeon when you can wear a hat and how to protect the scalp.
- New products (especially acids, strong exfoliants, or essential oils) unless your clinic approves.
How personalized hair care can support FUE results
While the grafts themselves are the foundation of FUE, many patients benefit from structured, long-term scalp and hair support. At FlowGeniQ Digest, we often discuss how targeted hair routines can complement surgical outcomes—particularly when they’re consistent and clinically guided.
For example, some patients explore genetics-informed approaches to optimize scalp care and growth support. If you’re interested in data-driven hair health planning, you can explore how genetic intelligence works through programs like ai receptionists (for smoother clinic communication) and ai interns for businesses (for streamlined patient support systems). While these tools don’t replace medical care, they may help patients stay organized with appointments and follow-up instructions.
Most importantly: any post-op regimen should be approved by your surgeon, especially in the first weeks when grafts are still stabilizing.
Week-by-week checklist you can screenshot
Use this as a quick reference for your FUE hair transplant recovery timeline. Always defer to your clinic’s specific instructions.
- Day 1: rest, head elevated, no touching grafts, follow meds.
- Day 2: protect scabs; resist scratching; hydrate and eat protein.
- Day 3: monitor swelling; keep head elevated; call if worsening.
- Day 4: gentle cleansing only if approved; no aggressive rubbing.
- Day 5–7: scabs managed; avoid picking; keep activity light.
- Week 2: scabs loosen and fall; continue prescribed washing.
- Week 3: shock shedding may start—normal; don’t panic.
- Week 4: shedding continues; take progress photos; attend follow-up.
- Weeks 5–6: shedding may peak; keep regimen consistent.
- Weeks 7–8: fine regrowth/stubble may appear.
- Weeks 9–10: gradual improvement; continue tracking.
- Weeks 11–12: 3-month checkpoint; regrowth varies by patient.
- Months 4–6: thickening and coverage build.
- Months 7–9: blending improves; density becomes more noticeable.
- Months 10–12: maturation continues; discuss long-term maintenance.
When to contact your clinic after FUE
Most recoveries are uneventful. But it’s better to reach out early if something feels “off.” Contact your clinic urgently if you experience:
- Fever or chills
- Severe or worsening pain not controlled by prescribed medication
- Rapidly expanding swelling or swelling that doesn’t improve
- Heavy bleeding or persistent discharge
- Signs of infection: increasing warmth, pus, foul odor, or spreading redness
- Severe allergic reaction (hives, facial swelling, breathing difficulty)
For non-urgent concerns (like slow regrowth or persistent mild itching), message or attend your next follow-up. Your surgeon can interpret changes in context and adjust your plan if needed.
Related FAQ: FUE hair transplant recovery timeline
1) Is shock shedding normal in an FUE hair transplant recovery timeline?
Yes. Shock shedding is a common part of the healing process for many patients, typically occurring between weeks 2 and 12. It usually reflects the hair cycle transition rather than graft failure.
2) When will I see real regrowth after FUE?
Many patients notice early signs around weeks 7–12, with more visible improvement from months 4–6. Best overall results often become clearer by month 9–12, though maturation can continue beyond a year.
3) What’s the typical recovery time before I can return to work or exercise?
Light work often resumes within a few days, depending on your job and clinic guidance. Exercise timelines vary: most patients avoid heavy workouts for at least the first 1–2 weeks (sometimes longer). Follow your surgeon’s specific restrictions.
4) How can I reduce swelling and redness after FUE?
Head elevation, medication adherence, gentle scalp care, and avoiding early strenuous activity are the most impactful factors. If swelling worsens instead of improving, contact your clinic.
5) Can I speed up results during the FUE hair transplant recovery timeline?
You can’t “force” growth, but you can support a healthy environment for regrowth: follow washing instructions, take prescribed medications, avoid irritants, maintain nutrition, and attend follow-ups. Any growth-support therapies should be surgeon-approved.
Ready to plan your FUE recovery with confidence?
If you’re considering or scheduled for FUE, your best next step is a personalized consultation. Your surgeon can review your donor supply, target areas, medical history, and expected timeline—so you know what to look for at each phase.
Tip: Bring your questions about swelling, shock shedding, medication timing, and when you can resume exercise and grooming.
Professional Disclaimer
This content is provided for general educational purposes only by FlowGeniQ Digest. It is not a substitute for professional advice, diagnosis, or treatment. Readers are advised to consult qualified professionals for personalized recommendations.
Medical Information Disclaimer
This content is provided for general educational purposes only by FlowGeniQ Digest. It is not a substitute for professional advice, diagnosis, or treatment. Readers are advised to consult qualified professionals for personalized recommendations.